 |
|
|
Networking >
MacOS X Ethernet/Wireless Configuration (Summary)
Note:If you would like connection guides with screenshots, they are available on the detailed connection guide page.
If you plan on using your Mac laptop with different types of
networking from different locations (e.g. a wired connection in your
residence hall room and wireless out on the steps), you will probably
want to learn to set up and use the Mac's Location Manager.
Start by choosing Mac Help from the Finder's Help menu,
search for location manager, and read about adding a network
location.
Setting Up Wired Ethernet
 Step 1. Connect Your Computer to the Network
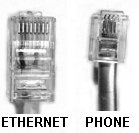
- Plug one end of the Ethernet cable into the network card
or port in your computer and the other into the Ethernet jack on the
wall.
- If your Ethernet jack has one orange port, plug your
cable directly into that port. If the Ethernet jack has two orange
ports, try the one on the right side first, as this is usually the
single activated port.
Step 2. Configure TCP/IP
- In System Preferences -> Network select Built-In
Ethernet from the Show: drop-down menu.
- With the TCP/IP tab selected, select Using DHCP from the
drop-down menu.
- Click Apply Now and then quit System Preferences.
Setting Up Wireless Ethernet
Step 1. Install the Airport Card
- Install your Airport card and software according to Apple's
directions.
- If the Airport Setup Assistant window appears, you can simply
close it. You do not need to use the Airport Setup Assistant.
- Do NOT set up your Macintosh to be an Airport Software Base
Station!
Step 2. Connect to the Wireless Network
- Go to a
location where wireless networking is
available. (http://www.columbia.edu/cuit/wireless/coveragemap.html)
-
In order to obtain a secure wireless connection through Columbia U Secure, please use these online
instructions.
If you choose not to use a secure wireless connection, select Columbia University from
the Airport drop-down menu located on the right of the menu bar.
Step 3. Configure TCP/IP
- In System Preferences -> Network select Airport from
the Show: drop-down menu.
- With the TCP/IP tab selected, select Using DHCP from the
drop-down menu.
For more information on DHCP, please see our detailed instructions.
- Click Apply Now and then quit System Preferences.
|
|
|
 |
