 |
|
|
Networking >
Windows Vista Ethernet/Wireless Configuration (Summary)
Setting Up Wired Ethernet
 Install your Ethernet card according to the manufacturer's
directions.
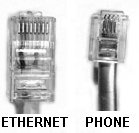
Connect your network cable to the ethernet card. Locate your Ethernet jack (it is
typically located
near your telephone jack but is slightly larger than the telephone jack) and plug in the
other end of
your network cable. If there are several ethernet jacks, try each one until you find the jack that is
enabled. You can test your connection by running a network software program such as
Internet
Explorer.
Install your Ethernet card according to the manufacturer's
directions.
Connect your network cable to the ethernet card. Locate your Ethernet jack (it is
typically located
near your telephone jack but is slightly larger than the telephone jack) and plug in the
other end of
your network cable. If there are several ethernet jacks, try each one until you find the jack that is
enabled. You can test your connection by running a network software program such as
Internet
Explorer.
Setting Up Wireless Ethernet
- Go to a location on campus where wireless networking is available.
Check our
coverage map for details.
-
Install Your Wireless Ethernet Card according to the manufacturers directions.
-
In order to obtain a secure wireless connection through Columbia U Secure, please use these online instructions.
If you choose not to use a secure wireless connection, click Start, select Control Panel. Select Classic View
from the menu of the left and then double-click on the Network and Sharing Center item.
Select Manage network connections from the menu on the left.
Right-click on the Wireless Network Connection item and then select
Connect/Disconnect. A list of wireless access points appears. Select Columbia University
and then click Connect.
Configure for DHCP
The default configuration that comes with the Operating System is the correct configuration for DHCP. To check this:
- Click Start then Control Panel. Select Classic View from the menu of the left and then double-click on the Network and Sharing Center item.
- Select Manage network connections from the menu on the left. Right-click on the Local Area Connection item and then select Properties.
- Select Internet Protocol Version 4 (TCP/IPv4) and select Properties. Verify that under
the General tab, Obtain an IP address automatically and Obtain DNS server address automatically are selected.
Releasing and Renewing your DHCP Lease
Your computer must have an IP (network) address appropriate to your location.
If you move your computer from one location to another, you may need to release the current lease and request a new one.
- Click Start, click Control Panel. Select Classic View from the menu of the left and then double-click on the Network and Sharing Center item.
- Select Manage network connections from the menu on the left and double-click on the Local Area Connection item.
- Click Disable to release your lease. Disabled is displayed in Local Area Connection. Double-click Local Area Connection to renew your lease. Enabled is displayed in Local Area Connection.
|
|
|
 |
