iMaps How-To Guide
This guide will walk you through the process of putting a iMap on your iPod. The first thing you’ll need is an iPod with photo capabilities, this includes any iPod with a full color screen, (iPod Minis and Shuffles don’t have photo capabilities). You will also need to have iTunes, if you don’t already have it, download it here.
- Download the iMap of your choice from the site and save the file somewhere that you can access it.
- With your iPod connected, open up iTunes.
- Once iTunes is open, click the small iPod button in the bottom-right corner of the window. It looks like this:

- Click the tab labeled iPod.
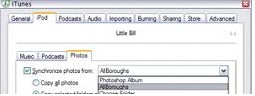
- Click the tab in the window labeled Photos.
- Click the checkbox labeled Synchronize photos & select the folder in which you saved the file:
- Click Choose Folder...
- Navigate to the folder with your file in it and open it.
- Select OK and you’re done!
|