

PROFESSOR ERIC ABRAHAMSON
COLUMBIA BUSINESS SCHOOL
Copyright Ó 2000 Professor Eric Abrahamson
Using Network Assistant:
Instructions
This exercise
is your mid-class exam. Start it early, as it will take you time to complete
it. It is designed to help you identify patterns in your approach to developing
networks of relationships. Your “interpersonal network” refers to the set of
relationships that help you get things done, and more generally, develop
personally and professionally. Managers in established organizations and
entrepreneurs seeking to launch new ventures use networks to obtain the
information, resources, and social support required to identify, evaluate, and
exploit opportunities for themselves and their firms.
You will begin by filling out information
about the people you were networked to in your last job, prior to attending
CBS. When you have finished providing network information, the network program,
called network assistant, will do two things. First, it will generate a
personalized report about your network. Second, it will generate a graphical
representation of your network, which you will customize to your needs. You
will then download a workbook that you must fill out to complete the
assignment. You must fill out the first part of the workbook, in order to
evaluate the strengths and weaknesses of your network. Based on this analysis,
in part II of the workbook, you will be asked to explain how you could have
modified your network in order to make it easier for you to do your job and to
be rewarded for doing so.
The remainder
of this document outlines four steps
that you must carry out in order to use Network Assistant, a Web-based network
program, in order to complete the network assignment due at the beginning of
session 5.
1) Enter
your network information, generate your report, and develop your network graph
by Friday, November 3rd
(see step 1 below).
2) On November 4th,
download your workbook off the course web site.
3) Fill out parts I and II of the workbook and hand it in by
the beginning of class 5.
Start this assignment early, as it is time-consuming to complete and is your
mid-class exam.
If you have a problem with any of these steps, contact
Barnabas Gero at [email protected].
Barnabas will also be scheduling workshops and office hours to assist you, if
necessary.
Step I: Entering data about your network
contacts (by November 3rd).
In this step, you enter information about your network
contacts in your last position prior to CBS, generate a report about your
network, and a graph of your network that you then customize.
To use Network Assistant, go to @@personal network assistant. You should have received an email with your user name and
password. If not, contact the teaching
assistant.
A network contact is any person that you knew or who knew
you in your last position and who had any bearing, whether positive or
negative, on your work, development, and career in that position. This would
include peers, superiors, and subordinates in your unit, in your function, or
in other functions in your organization. This would also include people you
knew outside your organization: clients, friends, family, government
regulators, suppliers, competitors, and so on.
![]()

![]() For
each contact, fill out the page and submit the information by pressing the “add
contact” button at the bottom of the page. For example, if you were adding
information about your superior, named Joe or Josephine Boss, your page might
look like this. You would scroll down the page using the arrow down button.
Upon submitting the information using the “add contact” button at the bottom of
the page, Joe Boss’s name would appear in blue in the contacts area. By
clicking his/her name in the contacts area, you can also modify the information
you entered.
For
each contact, fill out the page and submit the information by pressing the “add
contact” button at the bottom of the page. For example, if you were adding
information about your superior, named Joe or Josephine Boss, your page might
look like this. You would scroll down the page using the arrow down button.
Upon submitting the information using the “add contact” button at the bottom of
the page, Joe Boss’s name would appear in blue in the contacts area. By
clicking his/her name in the contacts area, you can also modify the information
you entered. 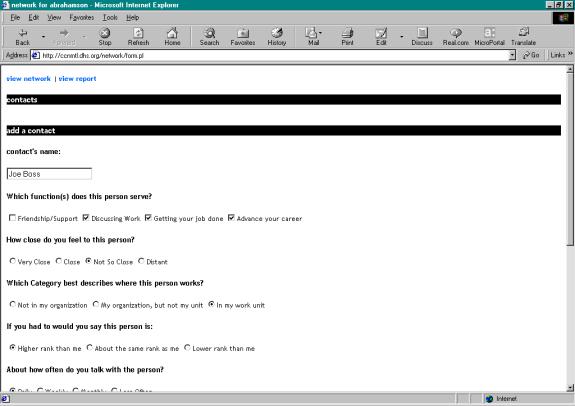
When you enter the name of a contact, be certain to enter
both first and last names. If by chance that contact name (e.g., John Smith)
has already been used by another person using network assistant, you will not
be able to enter that name, and you might have to modify the name you do enter
(e.g., John Smith1). After pushing the “add contact” button for your first
contact, repeat this step with each of your contacts. There are no limits to
the number of contact that you can enter.
You will learn more from this exercise by being very comprehensive.
Step II: Generating and saving your network report
(by November 3rd).
When you have entered all the information about your network
contacts, generate your network report, which you will fill out to complete the
workbook. To do so, click on the “view report” tab at the top of the page. Your
network report will be generated in a new page.
You must then copy and save your report. With the report page open press Ctrl-] or
Ctrl-[ to shrink/expand the report so that it appears in full on the screen.
With the full report in view, hold down the “Alt” key and press the “Print
Screen” key. This copies the image of the report that is on the screen. Then,
start Microsoft Word and open a new word document. Position the cursor where
you want the network to be copied and paste it (click Edit and then Paste).
Save the Word file so that you can find it again. When done, click “submit
report” at the bottom of the page.
Step III: Viewing a picture of your network
In this step, you view and modify a picture of your network.
a) Generating the picture
When you press the “continue to network applet…” hyperlink,
a new window will appear with a picture of your network bouncing around. Press
the freeze button to settle your network. You will note that you are linked to
all your network contacts by differently colored lines that indicate whether
you were very close, close, not so close or distant from that contact.
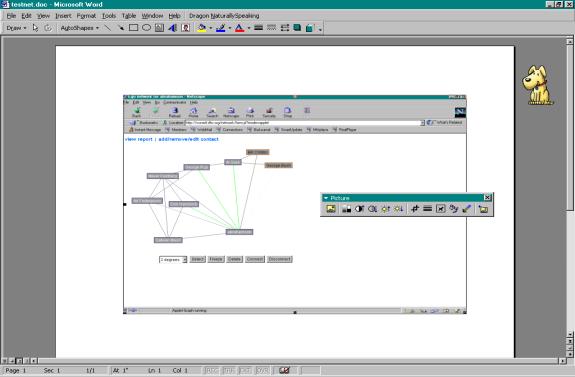
b) Moving the position of a contact
By clicking on a network contact with the left mouse button
and holding the button down, you can drag it on the map. Group, in close
proximity, contacts who belonged to a clique. A clique is a set of interlinked
contacts. For example, the network picture below distinguishes an organization
clique, from a subunit clique, from an external clique in Abrahamson’s network.
You may also want to array your contact along a vertical and horizontal
dimension (Power (vertical) and distance from your unit (horizontal) in the
example below).
Extra-Organizational Clique
Organizational Clique Unit Clique
My unit
Organization Outside
Organization
![]()
![]()
![]()
Power
![]()


Disclaimer:
Any resemblance to people living or dead is purely coincidental.
c) Adding links between contacts
You will then want to add links that existed between your contacts. To do so, click on both of the contacts you want to link. Then press the very-close, close, not-so-close, or distant buttons. This will to graphically display the nature of the link between your contacts. Enter as many links between contacts as you think necessary. If you click and nothing happens, try pressing the disconnect button, and then one of the connect buttons.
d) Adding details to your network map
When you are satisfied that you’re the image of your network
is exactly as you want it, you are ready to save your network image. Before exiting the page with your network
image, or shifting to another page or program window, with the network
graph window open and the graph in full view, hold down the “Alt” key and press
the “Print Screen” key. This copies your network on the screen. Then, start
Microsoft Word and open a new word document. Position the cursor where you want
the network to be copied and paste it (click Edit and then Paste).
To crop unnecessary parts of the network click View
and Toolbars. Click on the crop button.


![]() Then
move the crop icon to this location and click on the black square. The crop
icon will change into an inverted T. Holding the left mouse button down, drag
the inverted T to the point below
Then
move the crop icon to this location and click on the black square. The crop
icon will change into an inverted T. Holding the left mouse button down, drag
the inverted T to the point below 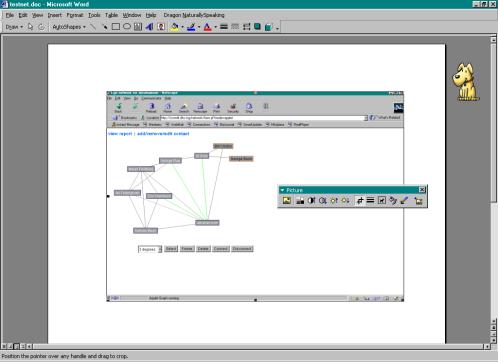 and release the left mouse button. This will cut the
unwanted part of the image out.
and release the left mouse button. This will cut the
unwanted part of the image out.
Repeat these steps with the other three middle black
squares.
![]() When you are finished, only the graph should appear. Click
on a corner of the graph and holding the left mouse button down, drag the
corner to increase the size of the image. You can then draw on the network.
Click on View, then Toolbars and then Drawing. Use the
button to circle cliques and the
When you are finished, only the graph should appear. Click
on a corner of the graph and holding the left mouse button down, drag the
corner to increase the size of the image. You can then draw on the network.
Click on View, then Toolbars and then Drawing. Use the
button to circle cliques and the ![]() button to add
text to the image. When you are done, save the word file so that you can insert
it later into your network workbook.
button to add
text to the image. When you are done, save the word file so that you can insert
it later into your network workbook.
There is no general way to annotate your network graph. Rather, use your creativity to annotate your graph in a way that clarifies the nature of your network.
.
Step IV: Generating and filling out your network
report (NB: not before November
4th).
When you have entered all the information about your network
contacts, generated your network report, and generated/modified your network
map, you will want to fill out the network workbook to complete the assignment.
To do so, go to the web syllabus, and download the workbook. Then, follow
carefully the instructions on the workbook.