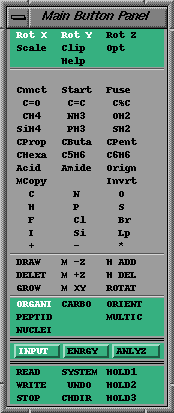
 MacroModel's Main Button Panel.
© Herc Silverstein 1997-1998
Use or duplication in part or in whole without prior written consent is prohibited!
Please send your comments to me at [email protected]
This is a short introduction to the MacroModel Molecular Modeling System. MacroModel provides the user with tools to build and graphically manipulate molecular structures, run energy calculations on these structures, and analyze structures and the results of the modeling (energy) calculations. When you have finished this introduction you will be able to read in molecules, save out your work, view and graphically manipulate molecules in 3D and make various measurements.
First, some useful things to know.
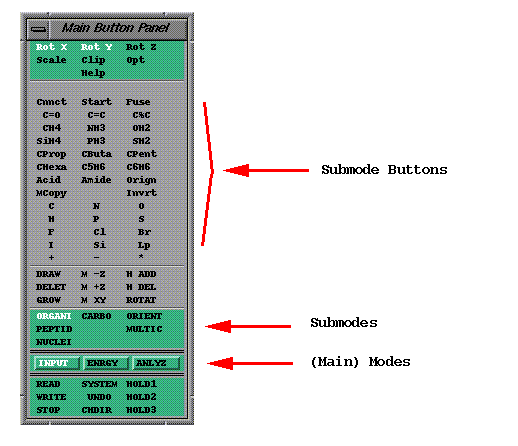
MacroModel uses a Main Button Panel to navigate the interface.
MacroModel's Main Button Panel.MacroModel is organized hierarchically. There are three main modes - INPUT, ENERGY and ANALYZE. Each of these has up to 9 submodes. A main mode is chosen and then a submode is chosen. This will display a "box" of buttons (which we will refer to as the submode buttons). Each main mode + submode has a different set of submode buttons associated with it. So choosing a different mode (or submode) will display a different set of buttons. (There are some other buttons that are always displayed at the very bottom of the Main Button Panel).
The following syntax is used to show how to activate a certain button. Mode -> Submode -> Button. That is, first you select a Mode, then a Submode and finally a button. An example is:
ANLYZ -> DISPL -> Ribbn
This sequence will display the Ribbon Panel which can be used to display ribbon diagrams. The following is what the Main Button Panel should look like. The activated buttons are circled in red.
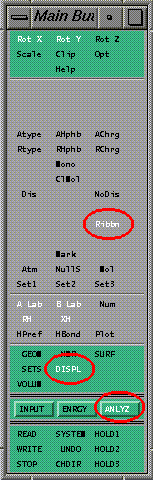
Again, this sequence of button clicks will enter the main mode ANALYZ, the submode DISPLay and activate the Ribbn button (which will map the Ribbon Panel). So the sequence of button clicks you would do would be: ANALYZ, DISPL, Ribbn, or in the syntax we will use: ANLYZ -> DISPL -> Ribbn. So when you see this syntax it shows the sequence of button clicks.
There is one exception to this rule. And it concerns the presence of the word "ALL". The following describes this exception. ALL --> ALL -> Opt. One might be tempted to look for a button called "ALL", but there is NO such button. It does not exist!
Some buttons are present in all the main MODES of the program. An example is the Opt button in the top right of the Main Button Panel. This button is always present no matter what mode or submode one is in.
Some buttons are present in all SUBMODES of that MODE. An example of this is in INPUT mode. The DRAW button (6 rows above the INPUT button) is always present when in INPUT mode and when in ALL of INPUT submodes (ORGANI, PEPTID, etc.). (The button in this location is different when in a different main MODE). In this case the syntax would be: INPUT --> ALL --> DRAW. Again, to reiterate there is no ALL button, rather it means that the DRAW button is available in ALL the Isubmodes of, for example, INPUT.
Another example is the READ button. The syntax is: ALL -> ALL -> READ. This means that the READ button is available (present) all the time.
Remember there is no button called "ALL". This word can only appear in the MODE or SUBMODE postion. If all this seems complicated, it isn't. Just remember that MacroModel's menus are organized hierarchically with 3 main MODES (INPUT, ANALYZe, and ENeRGY), and that each main MODE has up to 9 submodes.
To start MacroModel type the following and then hit the Enter or Return key.
You should see a screen that looks like the following:
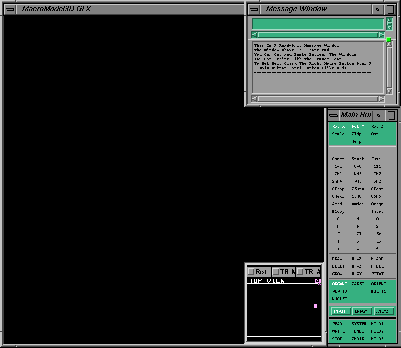 Initial
MacroModel Layout
Initial
MacroModel LayoutThere are 3 windows in this initial layout. The top right window is the Message Window and is used for displaying output and messages. The window at the bottom right is the Main Button Panel and contains push buttons used for operating the program. The remaining black window is the 3D Graphics Window (it is labelled with "MacroModel 3D GLX").
There is a Help facility in MacroModel. It can be invoked in a number of ways. First to get help on any button in the Main Button Panel (described in the previous section) select that button by pressing on it with the right mouse button. You should see a green panel which displays a help text specific to that button. Remember you can only do this in the Main Button Panel. Pop-up panels will not respond to clicking with the right mouse button.
You can also click on the Help button in the top of any mode in the Main Button Panel. This will bring up the same Help facility, but you will need to search for a topic by entering a word or words in the "Search Help File For" text field. If only one thing matches, it is displayed. Otherwise a list is displayed and you choose one of the items.
Once an item has been displayed you can not only read about it, but you know the sequence of button clicks to get to that button. The button sequence is at the top of the Help Panel and is the line of button names separated by arrows (-->).
MacroModel is designed for use with a 3-button mouse. Each button (left, middle, right) is used to perform different tasks. The representation of the mouse's location on the screen is called the cursor. In MacroModel the cursor appears as either a red arrow or a yellow square (with a transparent center). It turns into a square yellow square when the cursor is moved into the 3D Graphics Window.
The following is a short list of what the different buttons do:
LEFT: Used for picking in all MacroModel windows. Pick graphical buttons. Pick atoms in molecules. When picking atoms make sure the atom you wish to pick is positioned inside the yellow square cursor.
MIDDLE: Used only in the 3D Graphics Window. When held down and the mouse is moved allows transformations (rotations, translations) of molecules.
RIGHT: Varies depending on the window the cursor is in. The following list shows the window and the right button's functionality in that window.
| Cursor Window | What It Does |
| 3D Graphics | Spot Center by picking an atom |
| Main Button Panel | Click on a button to get help |
| Pop-up Dialog | Nothing |
Bring up the READ panel by clicking on READ found in the bottom left of the Main Button Panel (ALL -> ALL -> READ).
You should see a panel that looks like this:
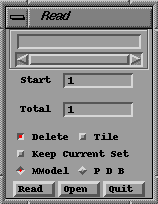 Read
Panel
Read
PanelClick on the Open button. This will display the Read (File) Selector.
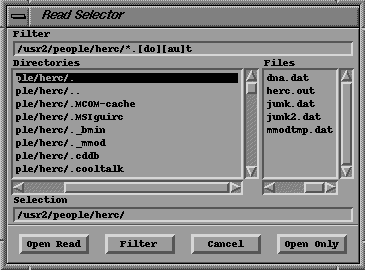 The
Read File Selector
The
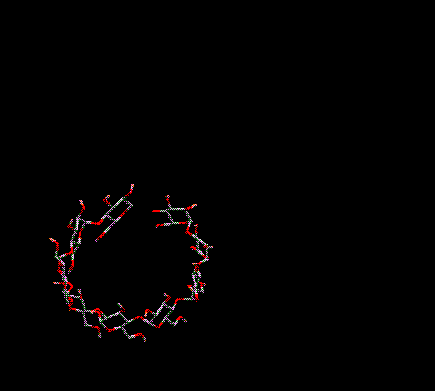
Read File SelectorSelect the file dna.dat from the list and then click on the Open Read button. You should see the following molecule on the screen:
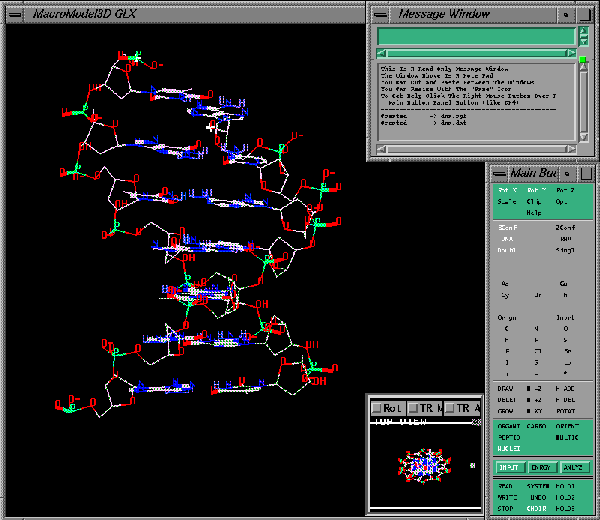 DNA
DNA
This is a piece of DNA exhibiting a double helix.
Some additional information on the Read (File) Selector follows.
There are a number of "windows" in this panel. The Directories window allows selection of a different directory. Double clicking quickly on the line takes you there. The line ending in "/.." near the top of the Directories window means go up one directory. Double clicking quickly on this takes you up one directory.
The Files window can be used to select a file. Double clicking quickly on one of the lines opens and reads that file. Alternatively, you can click once to highlight the item. Then select Open Read in the bottom left of the panel.
The list of files can be manually updated if necessary. This is done by clicking on the Filter button.
There is also a Filter Window. It contains two strings though they appear as one in the window. (A string is just a sequence of characters.) The first string is the path (directory). This string ends with the last '/' character. The second string is the file filter. It tells the program what files to display in the Files window in the given directory. The file filter is a strange sequence of characters. Initially it is set to *.[do][au]t. This tells the program to display all the files ending in .out and .dat. Files with different endings will not be shown! ** So be careful how you name your files, especially the extension. Always use .dat as the extension **
Lastly, if you know the name of a file and have the Read Selector panel displayed, you can enter the full name of the file in the Selection window. Then click on the Open Read button.
This section is not fully complete. It is a very quick overview of this topic.
To save all the molecules to a file bring up the WRITE panel by clicking on the WRITE button located in the bottom left of the Main Button Panel (ALL -> ALL -> WRITE).
You should see a panel that looks like this:
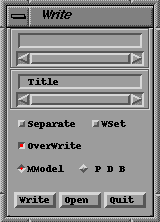 Write
Panel
Write
PanelClick on the Open button. This should display the Write (File) Selector.
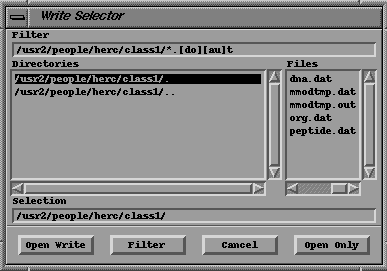 Write
File Selector
Write
File SelectorFor information on how to use a File Selector in MacroModel go to the previous "Reading In Molecules" section. You can go there by clicking on the following: Read File Selector.
The various represenations are controlled via the Opt Panel. To display the Opt Panel select Opt. The Opt button is available in all modes (ALL --> ALL --> Opt) and is located in the top right of the Main Button Panel. The Opt Panel has a number of buttons. Some of the buttons that control the various representations are:
| Button | What It Does |
| CPK | Enable CPK display |
| CPK Size | Allows setting of the size of the CPK spheres as a percentage |
| Ball n Stick | Enables ball and stick representation |
| Wireframe | Enables Wireframe display (the default) |
| Thickbonds | When wireframe is on determines whether bonds are drawn
out as
thin or thick bonds. Default is on (i.e. thick). |
With a molecule (or molecues) on-screen try selecting various representations. As you select a new representation the molecule(s) will be redrawn. Note that the representation applies to everything on-screen. You can not mix representations. Some examples of a molecule displayed using different representations:
 Wireframe
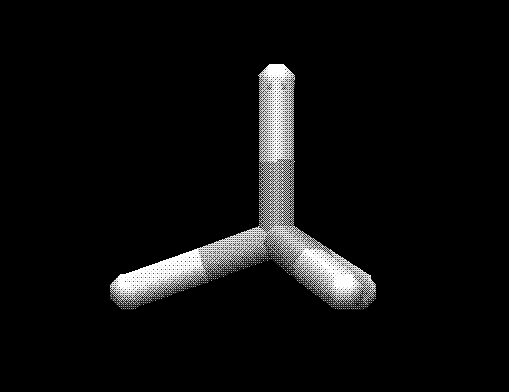 Polytube
 Ball
and Stick
Ball
and StickMeasuring distances is straight-forward. Turn on the Atom Distance button, ANLYZ --> GEOM --> ADist. Now select atom pairs by moving the cursor over an atom, clicking with the left mouse buton, moving the cursor over a second atom, clicking with the left mouse button. If you miss an atom, you may hear a beep and a message will appear in the Message Window (at the top right of the screen). If you succeed, you should see a purple dashed line with a number displayed next to it. This number is the distance in Angstroms.
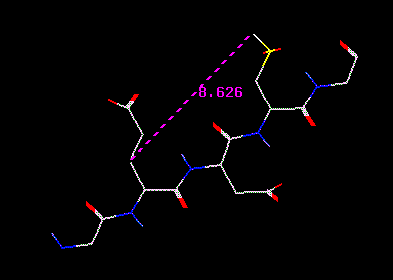 Distance
marker
Distance
marker
You can continue selecting atom pairs to create Distance markers. If you leave this submode (GEOM) and wish to add more distance markers later, you will need to reenter GEOM submode and select the ADist button again.
To remove all Distance Markers select the ADist button to turn it on and then once more to turn it off. This will remove all of the distance markers.
Bond Angle measuring is similar to measuring distances. First, turn on the Bond Angle button, ANLYZ --> GEOM --> BAngl. Now select the atom triplet that specifies the bond angle. If you pick 3 atoms successfully, a green dashed line will be displayed between the midpoints of the two bonds between atoms 1 & 2 and atoms 2 & 3. This is the bond angle in degrees.
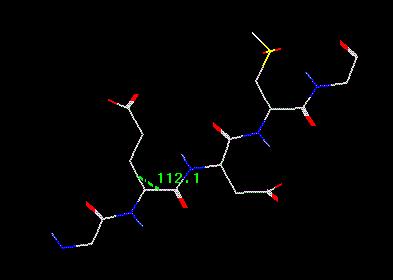 Bond
angle marker
Bond
angle marker
You can continue selecting atom triplets to create Bond Angle markers. If you leave this submode (GEOM) and wish to add more bond angle markers later, you will need to reenter GEOM submode and select the BAngl button again.
To remove all Bond Angle Markers select the BAngl button to turn it on and then once more to turn it off. This will remove all of the angle markers.
Torsion markers are created in a manner similar to distance markers and bond angle markers. Torsions require that 4 atoms be selected. Now select the atom quadruplets that specifiy the dihedral angle. If you pick 4 atoms successfully, a yellow dashed line will be displayed between the midpoints of two bonds - the bond between atoms 1 and 2 and the bond between atoms 3 and 4. This is the torsion angle in degrees.
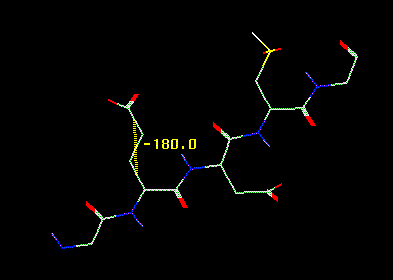 Torsion
marker
Torsion
marker
You can continue selecting atom quadruplets to create Torsion (Dihedral Angle) markers. If you leave this submode (GEOM) and wish to specify more dihedral angle markers later, you will need to reenter GEOM submode and select the DAngl button again (ANLYZ --> GEOM --> DAngl).
To remove all Torsion Markers select the DAngl button to turn it on and then once more to turn it off. This will remove all of the torsion markers.
To detect whether there are any hydrogen bonds in the on-screen molecule(s), use the hydrogen bonds feature. The button for this is always present when in ANLYZ mode and in any submode. (ANLYZ --> ALL --> HBond). When activated the number of hydrogen bonds, if any, will be displayed in the Message Window. If none are found, the message will state that zero (hydrogen) bonds were found. If one or more are found, then these will be displayed on-screen as purple dashed lines between the appropriate atoms.
 Hydrogen
bonds
Hydrogen
bonds
The presence or lack of hydrogen bonds in displayed structures is by no means absolute. This is controlled by selecting threshhold criteria. The criteria are the cutoff distance, donor angle minimum, acceptor angle minimum. By default these are set to 2.5 Angstroms, 120 degrees and 90 degrees, respectively, but the values can be adjusted with the ANLYZ -> ALL -> HPref button.
To remove all Hydrogen Bonds select the HBond button to turn it on and then once more to turn it off. This will remove all of the hydrogen bonds.
By default MacroModel allows you to rotate everything in the 3D window in the X and Y directions simltaneously. To do this move the arrow cursor into the 3D Graphics Window. Press and hold down the middle mouse button. As you move the mouse horizontally (keeping the middle mouse button depressed) everything on-screen is rotated around the Y axis. As you move the mouse vertically everything on-screen is rotated around the X axis. Moving in both directions simultaneously rotates around both axes simultaneously.
There are actually 3 axes around which one can rotate. The x-axis is parallel to your desk's top, i.e. horizontally. The y axis runs vertically. And the z-axis comes straight out of the monitor towards you. To limit (global) rotation around ONLY one axis hold down the CONTROL (ctrl) key, and hold down either the 'x', 'y' or 'z' key. Now hold the middle mouse button down and move the mouse. Doing this does a so-called global rotation around the axis (and only that axis) that was chosen. Note that the 'c' key is the same as the 'y' key (it's just a lot more convenient).
 Rotation
around just one axis (Y)
Rotation
around just one axis (Y)
You can translate everything on-screen in the 3D window in the X and/or Y directions. To do this move the arrow cursor into the 3D Graphics Window. Position it over a BLANK position on-screen (i.e. no atoms or bonds should be underneath the cursor). Press and hold down the right mouse button. As you move the mouse horizontally (keeping the right mouse button depressed) everything on-screen is moved in the X direction. As you move the mouse vertically everything on-screen is translated in the Y direction. Moving in both directions simultaneously translates in both directions simultaneously.
 Translation
in X and Y (XY)
Translation
in X and Y (XY)
The default in MacroModel is to color atoms by atom type. There are, however, a number of tools that can be used to recolor atoms. All of these buttons are located in ANLYZ --> Display.
One of the most useful features is to color all the atoms in a molecule the same color. This is automatically done in MacroModel by using the Color Molecules feature. ANLYZ --> Display --> ClMol. Doing this causes MacroModel to color the first 20 molecules with 20 different colors, molecules 21-40 using the same 20 colors, etc. This allows one to immediately see the different molecules there are on-screen. Often this is difficult to see since there are many atoms on-screen and the boundaries between molecules are unclear.
The following images are of the same structures. Each image contains the same 3 molecules - two polypeptide chains and an inhibitor. In the first image where things are colored by atom type it is impossible to see this.
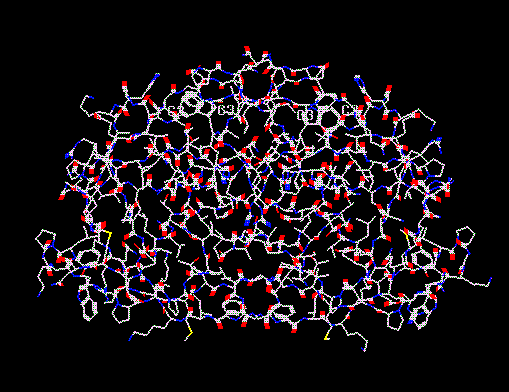 Color
By Atom Type (the default)
Color
By Atom Type (the default)In the second image (below) it is much easier to see the two chains (one in green, one in white) and the inhibitor (orange in the lower center). There are also some isolated atoms which are considered separate molecules and are colored in red, yellow, etc.
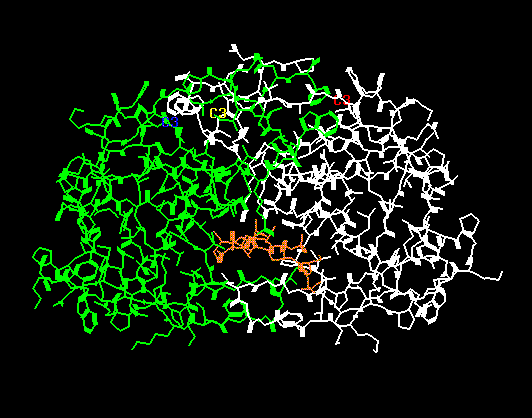 Color
By Molecule
Color
By Molecule To reset the color of the atoms to their original color (i.e. so they are colored by their atom type), select ANLYZ --> Display --> AType.
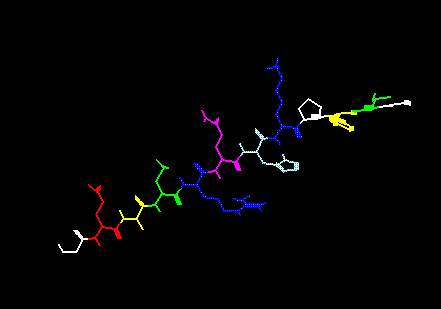
One can also color by residue type, residue hydrophobicity, and residue charge. To do this one would select the Rtype, RHphb and RCrhg buttons in ANLYZ --> Display, respectively. Here is a polypeptide chain colored by residue type.
 Color
By Residue Type
Color
By Residue Type
To bring up the Ribbon panel select ANLYZ --> DISPL -> Ribbn. The Ribbn button is on the right side in the lower half of the Main Button Panel. Clicking on this button should display a panel that looks like this:
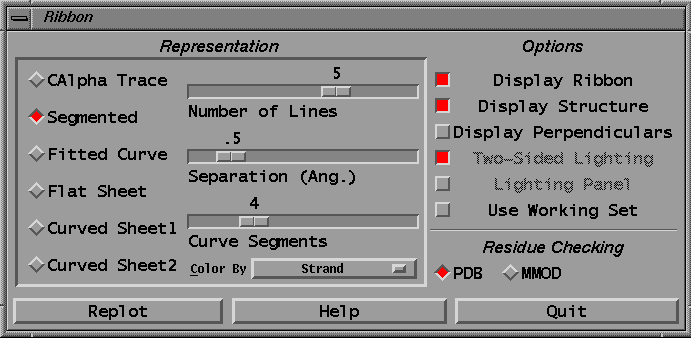 Ribbon
Panel
Ribbon
PanelTo get a ribbon to appear one has to click on the Replot button. By default this will display a ribbon on top of the structure. To view only the ribbon, turn off the Display Structure toggle. When selecting different representation options or setting the slider knobs, the changes are automatically updated. (There is no need to click on Replot).
Not all structures will plot a ribbon. MacroModel is fairly strict in what it will plot as a ribbon.
Any time a new structure is read in or all of the atoms are deleted the ribbon is erased.
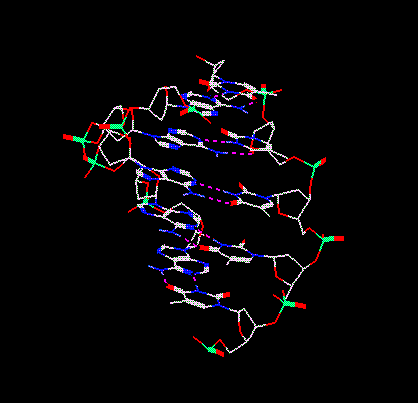
The following ribbons were created from the hiv.dat file. These diagrams were plotted with the "Display Structure" toggle button turned off. (This toggle is in the right side of the Ribbon Panel toggle button list under the "Options" column. You can display/undisplay the molecules by selecting/deselecting this toggle.)
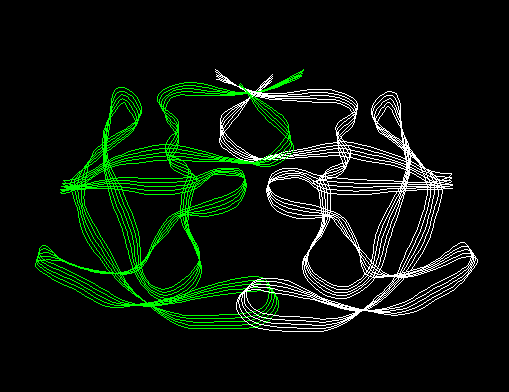 Ribbon
Diagram of HIV (structure turned off)
Ribbon
Diagram of HIV (structure turned off)Below is an example of what one can do by displaying some of the atoms in CPK, plotting ribbons in curved sheet style and setting the backround color. This takes a fair amount of work (by using SETS to put the inhibitor atoms into a set and then displaying that SET as CPK). This image was done with a system that supported 8-bit graphics. Slightly better color shading can be achieved on a machine with 24-bit graphics. In either case, though, ribbons make nice diagram.

© Herc Silverstein 1997 - 1998
Use or duplication in part or in whole without prior written consent is prohibited!
Please send your comments to me at [email protected]