Endodontic Instruments and Their Uses
Introduction:
A. Aims::
-
to acquaint the student with the endodontic armamentarium
- to relate the forms of the instruments to their functions and limitations
B. Instrument classification: present discussion is limited to hand-operated types:
- E
- E
- E,C, and S
- F
C. Instrument types:
- manufacture
- purposes
- methods of use
D. Instrument Standardization:
- basis
- color identification
- practical effects
E. What happens when you don't do right:
THE NO-NO's
Objectives:
A. Debriding and cleaning of the root canal.
B. Removal of all infected and affected dentin.
C. Smoothing of the canal walls.
D. Selective preparation of curved canal walls.
E. Tapering of the canal to receive a filling.
Note: Tapering and shaping of the canal is begun in conjunction with the debridement and cleaning of the canal. It is completed at the time of fitting the master filling point, at which time additional coronal widening (funnelling) may be required.
Armamentarium:
A. Barbed broaches
B. K-type files
C. Reamers
D. Mm. ruler
E. Rubber stops
F. Irrigating set-up
General Rules of Instrument Usage:
A. Obtain straight line access, insofar as it is possible.
B. Use instruments in sequence, NEVER skip sizes.
C. NEVER force an endodontic instrument.
D. NEVER traumatize periapical tissue; this will retard healing andcausepain.Measurement control stops must be utilized at all times. Accurate reference points are a necessity.
E. Minimize forcing of debris through the apical foramen by employing gentle instrumentation and proper measurement control.
F. Always work in a wet canal (flooded with irrigating solution). RC-Prep (a chelating agent) may be used by the more experienced clinician.
G. Clean instruments frequently during their use.
H. Never use an instrument that is dull or that shows signs of rust
or wear (untwisting, burnished areas, etc.) discard used instruments frequently,
especially in small sizes.
I. The canal must be kept clear of debris during all phases of instrumentation.Irrigate
continually
Endodontic instruments are traditionally divided into four categories:
- Exploring
- Extirpating
- Enlarging (cleaning and shaping), and
- Filling
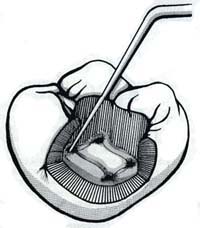
Natural anatomy dictates the ususal places for canals, but pulp stones, dystrophic calcifications and restorations can alter the actual configuration encountered. The endodontic explorer is used to locate orifices, and as a tool to remove calcification.
 |
 |
|
Using
the endodontic explorer.
|
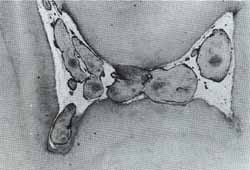
Pulp
stone occuping much of the pulp chamber.
|
from Pathways of The Pulp p.151
The barbed broach is an extirpating, NOT an enlarging, instrument. The barbed broach is formed from a tapered round shaft by lifting up portions of metal of the shaft almost at a right angle to the shaft. These elevated barbs will engage the pulp tissue and remove it from the canal. In its use, the largest size broach which will fit freely - loosely - in the canal is selected.
A broach must not engage the canal walls as it is advanced, or the pressure on the barbs will flatten them against the shaft; as the instrument is withdrawn, the barbs will then embed themselves in the walls, making it difficult or impossible to remove the broach. Because the barbs are "nicked" out of the shaft this is an extremely fragile instrument, and will break easily if misused. It must fit loosely.
 |
The barbed broach must always be fitted loosely in the canal. The barbs of a tightly fitted broach will engage the dentinal walls on the withdrawal stroke, greatly increasing the likelihood of instrument fracture. |
The K-type file is manufactured by twisting or grinding a square or triangular tapered shaft so that the cutting edges are almost perpendicular to the long access of the instrument. It is the instrument most commonly used for cleaning and shaping.
The K-file works on the "pull" stroke - that is, by scraping the canal walls as it is withdrawn from the canal. It is advanced to the full working length rotated 1/4 to 1/2 turn clockwise, and withdrawn while being pressed against one of the walls. The process is repeated against each of the walls in turn until the canal is sufficiently enlarged to proceed to the next size instrument. Do not proceed too quickly - it is preferable to utilize an instrument to the maximum extent possible before proceeding to the next instrument in the series. The file must be cleaned repeatedly during use; never use an instrument packed with filings or debris.
The root canal reamer is manufactured by twisting a tapered square or triangular shaft, but the fewer twists result in an instrument with the cutting edges more nearly parallel to its long axis. By rotating the reamer 1/4 to 1/2 turn clockwise, the cutting edges scrape the canal walls as it is advanced to the working length. The reamer must be in contact with the walls of the canal in order to be effective, but it must not bind or it may break.
Measurement Control Technique
Instruments should always be used with a rubber stop as a measurement control. The instrument tip pierces the center of the stop at right angles; it is then slid along the shaft to the correct working length. If the stop is not placed squarely at a right angle to the shaft of the instrument, a measurement error will result.
 |
 |
|
A. Measurement Technique |
B. Proper placement of measurement stops. |