Back to Cements | Back to Operative Videos
Zinc oxide-eugenol cement (IRM) is a low-strength base used as a temporary cement filling in the event that the patient will return at a later date for a semi-permanent restoration. The powder is mainly zinc oxide and the liquid is eugenol with olive oil as a plasticizer.
Right-click here to download this video.
( Choose the "Save As ..." option from the menu.)
Separate a sheet from the mixing pad and tape it to the working area to stabilize it.
Mix the cement.
Carefully and slowly shake the IRM bottle to evenly distribute the powdered
contents. Place three scoops onto the mixing pad.
Place four drops of the eugenol next to the powder. To mix, incorporate half of the powder into the liquid and fold it in using the stiff side of the mixing spatula and applying heavy force to ensure an even mix. Add the remainder of the powder, folding in. The final mixture should be putty-like; it should be tacky but malleable, and stiff enough to be properly condensed when placed.
Roll the mixed cement into a long roll and cut it into small pieces using the spatula.
Place the cement.
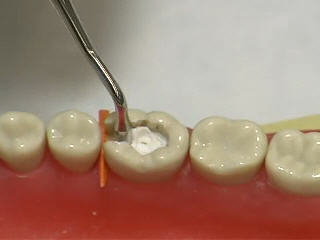
For a Class II preparation, place a wedge in the interproximal space; the wedge
serves to protect the interdental papilla and keeps it from coming in contact
with the cement. A matrix band may also be necessary in situations in which
a significant amount of tooth structure or an entire cusp has been removed.
Use the condenser to pick up a piece of the cement and place it into the prepared cavity. If the cement sticks to the instrument, place the instrument into the powder and reapply it to adequately condense the cement into the cavity. Place the cement in increments and lightly condense, until the entire cavity is filled.
Be sure to smear it against the cavosurface margin, creating a seal and simultaneously developing the occlusal anatomy.
Carve the cement.
Use the Hollenback carver to smooth the interproximal margin and to develop
the occlusal embrasure.
Use the cleoid and beaver tail carvers to develop minimal occlusal anatomy.
At this time, check the patient’s occlusion using articulating paper and remove any high spots if necessary. A damp cotton pellet can be used to help accelerate setting time and to smooth the surface of the cement.
After the cement has partially set, remove the wedge. Use of the wedge during placement has also allowed development of a gingival interproximal space for exchange of fluid; after a few days the patient can also use floss to clean this area.
Follow Up.
When the patient returns for placement of a semi-permanent restoration, a high-speed handpiece is used with lots of water to thin the IRM, which is then fractured away from the cavity walls using hand instruments.
If it is not possible to place a rubber dam with the IRM in place, cut the interproximal IRM to allow placement of the rubber dam prior to removing the rest of the temporary.
References:
Chapter 20, pg. 604-611. Restorative Dental Materials, 11th ed. (Craig & Powers)
Back to Cements | Back to Operative Videos