Advanced PDF techniques | PDFs with zero-width margins and eReader fonts | Create PDF bookmarks | Create PDF hyperlinks | Additional fonts for PDF writing | Convert TrueType to Type 1 fonts | Install Type 1 fonts in WPDOS 6.x | A Type 1 font installer for WPDOS 5.1 | Use the euro symbol in Type 1 fonts with WPDOS 6.x | Use any symbol in a Type 1 font with WPDOS 6.x | Use the euro symbol in Type 1 fonts with WPDOS 5.1 | Use any symbol in a Type 1 font with WPDOS 5.1 | Convert OTF fonts to Type 1 | Home page
This page offers advanced techniques for creating PDF files from WordPerfect for DOS, including PDF bookmarks, PDF hyperlinks, zero-margin PDFs, and PDFs that include scalable soft fonts with support for any character or symbol in those fonts.
Basic PDF techniques may be found on other pages, including the vDosWP page, the DOSBoxWP page, and, for those still using 32-bit Windows or other operating systems, a page about older methods of creating PDF files.
This page was inspired by the work of Alfredo Fernández Díaz, who uses the name Mr Warper in the WordPerfect Universe forum. He first proposed creating zero-margin PDF files and PDF files with bookmarks and hyperlinks directly from WPDOS.
Unlike pages printed from physical printers, the content of PDF files can extend the full width of the page, so that graphics and lines need not be indented from the margins. The WPDOS 6.x printer drivers in this wp60epdf.zip archive make it possible to create PDF with zero margins if you choose, and in any "paper" size that you create.
The archive contains two PostScript drivers. Both can, if you choose, create PDFs with zero or very small margins. The driver named PostScript-PDF-AnySize (wpdos.org) is the one that you should probably use.
Another driver, named PostScript-PDF-eReadFont (wpdos.org), lets you create PDF files with some fonts typically used in eReaders (Amazon Ember, Bookerly, Georgia Pro, Literata), but only if you are using the vDosWP system and you replace the existing copy of gswin32c.exe in your vDosWP\Programs folder with the copy in this gswin32c-ereader.zip archive. Make absolutely certain that you have replaced the existing vDosWP copy of the file with the one in the archive before using this drive. Make absolutely certain that you understand this before you waste your valuable time sending me a message saying that you don't see the eReader fonts in your PDF file!
To use these drivers, download the archive with the driver; extract the ALL file and copy it into your Printer Files directory. In WPDOS, choose Select Printer, Additional Printers, and choose one of the two drivers named above.
Use one of the PDF-writing macros described above to create a PDF file, or, in vDosWP, set the driver to print to LPT3, so that a PDF will be created on your desktop.
These drivers are based on the pioneering work done Alfredo Fernández Díaz, who posts his work at the wpuniverse.com forum under the name Mr Warper. His work can be found in this thread.
WPDOS can create PDF files with bookmarks using the WPDOS Table of Contents feature. This section includes a macro that automates this feature using a WPDOS 6.x macro that inserts printer commands that create PDF bookmarks corresponding to the Table of Contents items in the WP document.
In WPDOS, select the text you want to use as a PDF bookmark (typically one word or a few words), press Alt-F5, and mark the text for Table of Contents, Level 1. Do this for each word or phrase that you want to use as a bookmark. The bookmark name in the resulting PDF will be the same as the text that you select.
You do not need to define or generate a Table of Contents; simply mark the text as a Table of Contents item.
Download this WordPerfect for DOS 6.x PDFBMTOC macro , by Alfredo Fernández Díaz, and copy it to your WPDOS macro directory. After running the macro, in vDosWP, use the PDFMAKER or PDFVIEWR macros in vDosWP, or simply print to LPT3 from your PostScript printer driver. (This method should also work in DOSBoxWP, but I have not tested it.)
If you use Windows, but you do not use vDosWP or DOSBoxWP, then save the "printer" output to a PostScript (.ps) file and convert it to PDF with this open-source freeware PDF Distiller.
WPDOS 5.1: A similar macro for WPDOS 5.1 should be easy to write, though it require some fussy effort to get it to work correctly. You can however, simply save a WPDOS 5.1 file with Table of Contents entries, open in WordPerfect for Windows as described in the section below, and use WPWin's File->Publish to PDF feature to create a PDF with bookmarks from your WPDOS 5.1 file.
To generate a PDF with internal hyperlinks from WPDOS 6.x, create the hyperlinks in your document using the Alt-F5 menu in WPDOS 6.x. Save the document to the default WPDOS 6.x format; open the document in any recent version of WordPerfect for Windows, and, from the File Menu, choose Publish to PDF. Click the Settings button; go to the Document tab, and make sure that "Include hyperlinks" is checked. (Also make sure that "Generate bookmarks" is checked, in case you create documents that include Table of Contents entries as described in the section above.)
If your WPDOS document contains both Table of Contents entries and hyperlinks, so that the resulting PDF will have both PDF Bookmarks and PDF Hyperlinks, then you must save the document in WPDOS 6.x at least once in WPDOS 5.1 format to avoid a bug in WPWin that causes bookmark names to be truncated in imported WPDOS 6.x documents. Open the 5.1 version of the document in WPDOS 6.x, and save it again in 6.x format so that the resulting file will include hyperlinks. You may then use WPWin to create the PDF file as described in the preceding paragraph.
All the techniques on this page require the use of a PostScript printer driver in WPDOS. These drivers typically support only the thirty-five standard fonts built into almost all PostScript printer. To use other fonts, and create good-looking scalable type in PDF output, you will need to install Type 1 soft fonts, which must be installed into your WordPerfect Ghostscript or other PostScript printer driver. This remainder of this page explains how to do it, and how to create PostScript Type 1 fonts from your existing TrueType fonts.
Standard Windows fonts are in TrueType format, not Type 1 format. To convert TrueType font files to Type 1 format, choose the ones you want to convert, and copy them from the Windows \FONTS folder to some other directory before converting.
For the conversion itself, you may use a commercial font converter such as TransType or the freeware utility ttf2pt1.exe, which may be downloaded from this site through the generosity of the author, Frank Siegert. (The ttf2pt1.exe utility is part of the excellent shareware package PStill, which generates PDF files from PostScript print files. PStill is available from Frank Siegert's web site, and costs about one-tenth the price of Adobe Acrobat.) Download ttf2pt1.exe and place it in any convenient directory, preferably the directory in which you copied the TrueType fonts that you want to convert.
To use the ttf2pt1.exe program, open a command prompt (Help! How do I open a command prompt?), and navigate to the directory in which you have the program and your TrueType fonts that you want to convert. Run the program, using this syntax (explained immediately below) for converting a TrueType font to a Type 1 font:
ttf2pt1 -b filename.ttf fontname
Make sure to type -b with a lower-case b (not upper-case B); replace filename.ttf with the filename (or the complete directory path- and filename) of the TrueType font you want to convert and replace fontname with the name that you want to become part of the output filenames fontname.pfb and fontname.afm (you will need to use both the .PFB and .AFM files that are produced by the program). When you have the Type 1 fonts that you need, you need to install them in WPDOS.
Note: For copyright reasons, ttf2pt1.exe does not convert custom hints in a TrueType font into custom hints in a Type 1 font. Instead, it applies "generic" hinting to the Type 1 font. Depending on the font, this may produce less satisfactory results than the original font when displayed on screen or when printed on low-resolution printers.
Important: WPDOS may have trouble installing and using the extremely large fonts standard in Windows today. Instead of using tt2pt1.exe, you can install the free FontForge font-editing program, which lets you convert a TrueType fonts into a Type 1 font. Open the converted Type 1 font in FontForge, and remove non-standard characters (typically near the end of the file) before importing the font into WPDOS.
In WPDOS 6.x, you can install Type 1 fonts from either the Font dialog (press Ctrl-F8, then Shift-F1, then Install-Delete Fonts), or from the Edit Printer Setup screen (press Shift-F7/Edit/Font Setup/Install-Delete Fonts). When the WP Font Installer opens, choose Type 1, and follow the prompts. When installing fonts for use in PostScript printer drivers, select the fonts you want as "Soft font'; if you want to view the font in WPDOS graphic mode or print preview, then also choose the same fonts as "Graphics." If you do not absolutely need accurate displays in graphics modes, choose "Soft font" only to avoid overloading the file that contains font data for WP's graphics modes. (In the case of PostScript printers, Soft fonts and Graphics fonts are created from the same files, but they are handled differently by WordPerfect. See the note immediately below.)
When you install a soft font with the WP Font Installer, the font is added both the printer definition file (.PRS file) and to the specific .ALL file that is the source of the .PRS file. For example. If you have more than one printer definitions (.PRS file) that derive from the same .ALL file (for example, multiple printer definitions based on this site's Ghostscript printer drivers), you only need to install your fonts into one printer definition, and then use the Update option on the Select Printer menu (under Shift-F7/Select) to add the newly installed fonts to other printer definitions based on the same .ALL file.
Note: Advanced users who customize their own Automatic Font Changes (AFCs) may need to recreate these changes for each printer definition. These changes are not saved in the .ALL file, and the method for changing AFCs in an .ALL is extremely complicated, and must be performed separately for each printer definition. If you wish to try, follow these basic instructions:
Editing AFCs in an .ALL file: To edit an .ALL file, you need the WP Printer Definition Program (PTR.EXE). Make a backup copy of the .ALL file that you want to edit, and save the backup with a different file extension (not .ALL), so that WPDOS will not list the definitions that are included in the backup copy. Open the .ALL file with PTR.EXE. Select a printer that you wish to modify; choose Edit/Fonts; from the Font Type dropdown menu, select Built-In. Choose Create, and select Non-Shared. From the list of font libraries, select the first one that is not named "Non-Shared Built-In", choose Edit, use the star key to select all the fonts, select Copy, choose Non-Shared Built-In, and choose OK. Repeat this for each font library in the list. When you have done this with each library (and have copied all the fonts to the Non-Shared Built-In library), use the star key to UNmark all of the libraries that are not named "Non-Shared Built-In" so that only "Non-Shared Built-In" is marked for use by the printer. Now, from the drop-down list of Font Types, choose Soft Font (KB), and repeat the same procedure: first, create a "Non-Shared Soft Font (Kb)" library; then copy the fonts from all the other listed libraries into it; and then UNmark all the libraries that are not named "Non-Shared Soft Font (Kb)". You may now select any font in the Non-Shared libraries that you created and create AFCs for that font; the AFCs can use fonts from the same or other Non-Shared libraries.
With WPDOS 5.1, you should use different techniques for installing (a) older commercially-sold Adobe Type 1 soft fonts and (b) all other Type 1 soft fonts, including those made by converting TrueType to Type 1. Details follow:
(a) In WPDOS 5.1 first few hundred soft fonts released by Adobe Systems are supported by original WordPerfect printer drivers that are downloadable from Corel's page for WPDOS 5.1 printer drivers. Search for "PostScript (Additional" (without the closing parenthesis) and download all matching files. A list of supported Adobe typefaces is available in a self-extracting archive. The fonts themselves are not included in these drivers; these drivers will only be useful to you if you already own one or more of the Adobe soft fonts that are supported by the drivers, and now want to use those fonts with WordPerfect. After downloading one of these "PostScript (Additional" drivers (contained in an .ALL file) you may use it instead of any other PostScript driver, or, preferably, you can use the PTR.EXE supplied with WPDOS in order to copy the font definitions from the PostScript (Additional) driver into the .ALL file that contains the driver you prefer. Consult the WordPerfect 5.1 manual (pages 520-21) for instructions on copying font definitions between two .ALL files.
(b) The PrimeType font installer: To install all other Type 1 soft fonts into WPDOS 5.1, you will need a special set of tools available from this site in a self-extracting TYPEINST.EXE archive (449 KB). If you are using 64-bit Windows, then use either the vDosWP Plain DOS or DOSBoxWP PlainDOS to open a DOS prompt, and run the program from the DOS prompt to extract the tools.
The files in this archive are part of a larger software package that is no longer marketed, PrimeType for WordPerfect, by LaserTools (distributed outside the United States as Adobe TypeManager for WordPerfect), and are posted here with the generous permission of the original authors. Please note that most menu items in the installer program will not work because the full package will not be on your disk. For the purposes of this installer, you do not need any files other than the ones included in the archive. (One non-essential file is included: PTKEY51.WPK; this is a WPDOS keyboard definition that includes macros for quick entry of typographic quotation marks, dashes, and other characters not included on the standard keyboard.)
Note: The original PrimeType retail package included fonts and software code that were copyrighted by Adobe, and so the full package may not legally be posted on the Internet. However, the files posted on this site contain no Adobe code, and do not violate Adobe's copyright in any way.
To use this installer, please follow these steps exactly:
If you are using 64-bit Windows, use either the vDosWP Plain DOS or DOSBoxWP PlainDOS to open a DOS prompt; then:
(1) Create a directory to contain the Type 1 fonts that you will install into WordPerfect, typically C:\PSFONTS. If you already have a directory by that name that contains dozens of Type 1 fonts, create a separate directory to be used only for installing fonts into WPDOS. The type installer will probably crash if you use a directory containing too many fonts.
(2) Copy a small number of Type 1 fonts into the directory you created in the preceding step. You will need the *.PFB and *.AFM files, not the *.PFM files. If you have *.INF files for your fonts, copy those also, but they are not absolutely required.
Note: If you have only a .PFB and .PFM file for one of more of your Type 1 fonts, but no .AFM file, use this freeware PFM2AFM.EXE utility to generate an .AFM file from the .PFM file.
(3) Open a DOS window, and extract the files in TYPEINST.EXE into your WordPerfect directory, typically C:\WP51. Close the DOS window.
(4) Use Windows Explorer to list the contents of your WordPerfect directory. Select the file PTINSTAL.EXE. Right-click on the file, select Properties, then Program. In the Cmd line or similar field, after PTINSTAL.EXE, add a space and the command-line switch "/A" (without the quotation marks). The command-line switch is important! Add a checkmark next to "Close on exit." In Windows 9x, click on the Advanced button, and add a checkmark next to "Prevent MS-DOS-based programs from detecting Windows." In Windows Me, this check box is on the Program tab itself. (You will not find this checkbox, and will not need it, under Windows NT, 2000, or XP.) Click OK to close the Properties dialog.
(5) Double-click on PTINSTAL.EXE to launch the program. Choose "Edit miscellaneous PrimeType options" (which only appears if you added the /A switch in the preceding step), then "Edit PrimeType directory locations" and make sure the first, second, and fourth fields are correct. Do not type anything in the "WPWin printer directory" or "Dot matrix temporary file dir" fields. Go down to the last field, press Enter, then select "Return to the main menu."
Note: If (and only if) the rest of the procedure is completed successfully, you will not need to set these directory locations again. The option to set the locations only appears if PTINSTAL.EXE is started with the /A switch, so you may, if you like, remove the /A switch from the shortcut in order to see a less cluttered menu.
(6) Select "Install fonts already on your hard disk," then "WordPerfect PostScript printer drivers." Choose the same driver that you use when printing to your PostScript printer. Press Enter to select it, then select the soft fonts you want to install, press Enter to select them, and F10 to install them. If you see the "Success!" message, return to the main menu, and select "Save changes and exit to DOS."
(7) Start WordPerfect. Choose Shift-F7/Select Printer, and select the printer to which you installed fonts as your default printer. Choose Edit, then Update; then, under Initial Base Font, make certain that the font that you installed is listed among the other fonts. In Path for Downloadable fonts and printer command files, enter the name of the directory you created in step (1). Return to the editing screen, select your newly-installed font, and print.
Some (not all) Type 1 soft fonts include a euro symbol, but you must take some additional steps before you can print that symbol from WordPerfect. Follow these steps only if you are certain that the euro symbol is in fact in your soft font.
To edit a WPDOS 6.x printer definition, you need the WP Printer Definition Program (PTR.EXE). Make certain that you have a copy of this program before you proceed.
In WPDOS 6.x, when installing your Type 1 soft font, take careful note of the name of the .PRS file into which you installed the font information.
Then, if you are using 64-bit Windows, then use either the vDosWP Plain DOS or DOSBoxWP PlainDOS to open a DOS prompt, and do the following in the DOS prompt:
In the directory with your printer files, run the command PTR YOUROWN.PRS (replacing YOUROWN.PRS with the actual name of your .PRS file). If you already had a copy of PTR.EXE on your system, and it is in a different directory, use the full path of PTR.EXE in the command.) (Help! What does a "full path" mean?) Follow this sequence of menu items: Edit/Fonts/Soft Font (kb)/Non-Shared Soft Font (kb), and find and highlight the name of the font you installed. The name will be followed by "Type 1" in parentheses.
With the font name highlighted, choose Edit/Character Map. The name of the font's character map (probably the same name as the font itself) should be highlighted. Choose Edit, then Current Character Set to Edit, and select Typographic Symbols from the drop-down list. Scroll down to character 72 Circle-U (or use Search to go directly to 72). Press Enter, use the Tab key to go to the Expression window and press F5 to enter the Global Variables menu.
Press 2 - Create, then enter the name "euro" (no quotation marks) as the name, and remove the check box, if any, next to Use Pattern. Press OK. With the highlight on euro, select 2 - Edit, and enter the following text in the Expression editing window:
"/Euro glyphshow "
Note that this begins with a quotation mark, then a forward slash, then Euro spelled with an upper-case E. Note that it ends with a space followed by a quotation mark. Do not omit the space! Do not omit the quotation marks! Do not spell Euro with a lower-case e! Press F7.
With "euro" highlighted in the list of variables, press 8 - Insert to enter "euro" into the lower part of the Edit Character Map Printer Command window.
Note: If, and only if, you are editing a monospaced, non-proportional font, ignore the following paragraphs and press F7 until you are prompted to save the file (answer Yes) and exit PTR.EXE.
Press F7 until you are back at the Edit Font dialog. Choose Size and Spacing Information/Spacing/Proportionally Spaced/Proportional Spacing Table..., and press Enter to bring up the list of tables. Your font's proportional spacing table (probably with the same name as the font itself) will be highlighted. Choose Edit. If the Character Set is not Typographic Symbols, choose Character Set and select Typographic Symbols.
In the list of symbols, scroll down to character 11 Pound/Sterling. Note the number in the right-hand column that indicates the width of the character; in almost all fonts, the width of the euro will be the same as the width of the Pound/Sterling character, and also the same width as the dollar sign and other currency symbols. (In the Impact font that we are using as an example, the width is 27; it will almost certainly be different in your font!) Scroll down to, or search for, character 72 Circle-U. Press Enter and type in the same number that you noted as the width of the Pound/Sterling character. Press F7 until the program prompts you, "Save File?" Answer Yes, save the file, and exit PTR.EXE.
Explanation: In order to print any character in a proportional font, the character must have an entry in both the Character Map and the Proportional Spacing Table for the font. If either of these two entries is missing, the character will not print.
Note for expert users of WPDOS 6.x: When the WP Font Installer installs a Type 1 font for a PostScript printer, it modifies both the .PRS file and the .ALL file from which the .PRS file is derived. An expert user should probably make the changes described above in the .ALL file, and then Update the .PRS file from within WPDOS. When modifying a font setting in the .ALL file, if the character map for the font is "Adobe Standard Encoding", then you may want to change the character map to "PostScript 1 euro" or, for monospaced fonts only, "PostScript fixed euro", if you find either of these in the .ALL file. For monospaced fonts, no changes are required in the Spacing options, but the changes described above will be required in the Proportional Spacing Table for any proportional-spaced fonts.
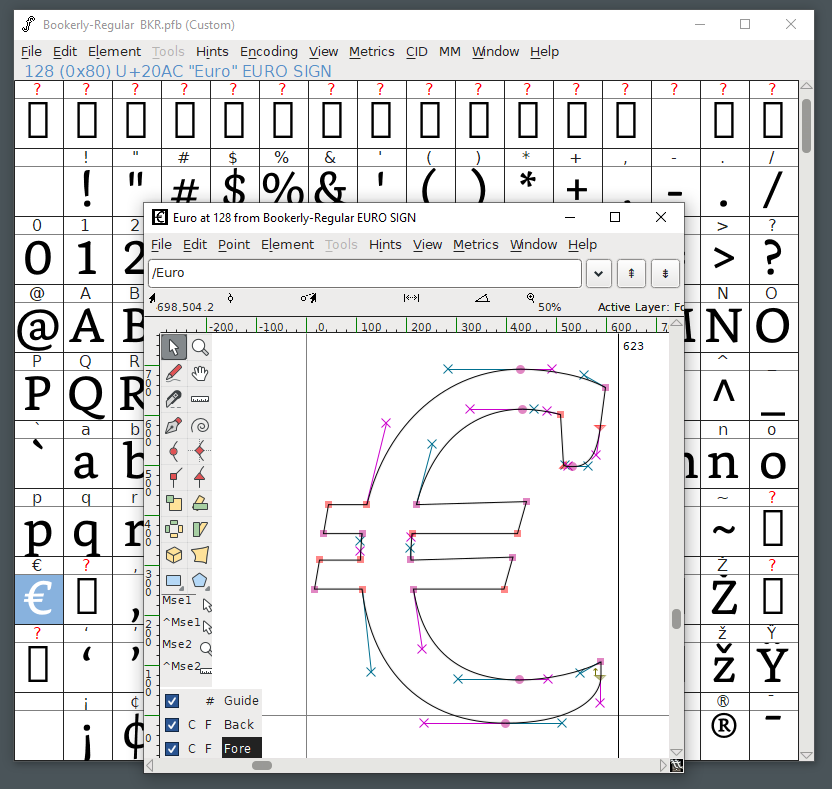
WordPerfect can print any character or symbol that is present in an imported Type 1 font, whether or not the WP font installer automatically adds support for that symbol. To find all the symbols present in a Type 1 font, install the free FontForge font-editing program and open the font for viewing. When you find the symbol you want, right-click on it and choose "New Outline Window" from the pop-up menu. The resulting window will look something like this. The window to focus on is the smaller window in the foreground.
In the field below the top-line menu, note the name of the character (in this example, "/Euro"); the name is case-sensitive, so be careful to note upper- and lower-case characters. This is the glyphname of the character.
In the upper right of the character-outline window, note the width of the character (in this example, 623). You will need both the glyphname and the width in the steps that follow.
Now, follow the procedure described above for adding the euro symbol to the WPDOS 6.x printer driver. If the character that you want to use is already in a WPDOS character map, use that symbol instead of the 4,72 symbol used for the euro; if the character is not already in a WPDOS character map, choose a similar symbol, or add the character to the user-defined character map 12.
Some (not all) Type 1 soft fonts include a euro symbol, but you must take some additional steps before you can print that symbol from WordPerfect. Follow these steps only if you are certain that the euro symbol is in fact in your soft font.
For WPDOS 5.1, while installing your soft font using the method described above, take careful note of the name of the .ALL file into which you installed the font. Run the WP printer definition program PTR.EXE (which should have been installed with WP itself), and open the .ALL file into which you installed your font. Select the printer name that you chose when installing the font; press Enter to edit; select Fonts, navigate down to Soft Fonts (kb), and chose the heading "*PTWP: [your printer name"; Press Enter to edit.
Navigate to the name of your newly-installed font; press Enter to edit; select Character Map and press Enter to edit. The name of the font's character map should be selected (and will have an asterisk next to it); press Enter to edit it. In the Character Map editing window, press PgDn until you reach 4,0, then use the down arrow until you reach 4,72.
Press Ctrl-Enter to "Edit in window"; press Alt-F8 for Global; press 1 for Add; press Ctrl-Enter for default; type "euro" (without quotation marks) as the name and press Enter; press Enter to move to the right side of the window and type the following text:
"/Euro glyphshow "
Note that this begins with a quotation mark, then a forward slash, then Euro spelled with an upper-case E. Note that it ends with a space followed by a quotation mark. Do not omit the space! Do not omit the quotation marks! Do not spell Euro with a lower-case e! Press F7.
You should now be back in the character map window, and he lower part should be empty. Carefully type into the lower part of the character map window the string
euro
with a lower-case e and no quotation marks, and press F7.
Note: If, and only if, you are editing a monospaced, non-proportional font, ignore the following paragraph, and proceed from the paragraph that begins: "Press F7 until you are prompted to save the file and exit PTR.EXE."
Press F7 again, and then F7 once more, and cursor down to Size and Spacing Information. Press Enter, and then navigate down to Proportional Spacing Table, and press Enter. Press Enter again to edit the proportional spacing table for your font. Press PgDn until you see character 4,0, then use the down arrow until you see the width setting for character 4,11, Pound/Sterling; this is almost certainly the same width as the euro symbol in your font. Use the down-arrow to find character 4,72, and enter the same width number that you found in character 4,11.
Explanation: In order to print any character in a proportional font, the character must have an entry in both the Character Map and the Proportional Spacing Table for the font. If either of these two entries is missing, the character will not print.
Press F7 until you are prompted to save the file (answer Yes) and exit PTR.EXE. Open WPDOS. Use Shift-F7, then S - Select, then 7 - Update; press F7 to return to the editing screen.
WordPerfect can print any character or symbol that is present in an imported Type 1 font, whether or not the WP font installer automatically adds support for that symbol. To find all the symbols present in a Type 1 font, install the free FontForge font-editing program and open the font for viewing. When you find the symbol you want, right-click on it and choose "New Outline Window" from the pop-up menu. The resulting window will look something like this. The window to focus on is the smaller window in the foreground.
In the field below the top-line menu, note the name of the character (in this example, "/Euro"); the name is case-sensitive, so be careful to note upper- and lower-case characters. This is the glyphname of the character.
In the upper right of the character-outline window, note the width of the character (in this example, 623). You will need both the glyphname and the width in the steps that follow.
Now, follow the procedure described above for adding the euro symbol to the WPDOS 5.1 printer driver. If the character that you want to use is already in a WPDOS character map, use that symbol instead of the 4,72 symbol used for the euro; if the character is not already in a WPDOS character map, choose a similar symbol, or add the character to the user-defined character map 12. Remember to add a space after "glyphshow" in the string that you add to the printer driver!
Many modern fonts from Adobe and other vendors are packaged in the new OpenType Format (OTF), which is not recognized by WPDOS. The OTF format can be either TrueType-flavored (meaning that it serves as a package for TrueType fonts) or PostScript-flavored Type 1 fonts (meaning that it serves as a package for Type 1 fonts); if, and only if, an OTF font is PostScript-flavored font, you can extract from it traditional Type 1 fonts that WPDOS can recognize.
To perform this feat, you will need the freeware cfftot1.exe program which is documented here and may be downloaded from the links on its author's main page. I have not tested this program. (Or, more easily, you can find this and other tools in this set of Windows binaries of type tools.