 |
|
|
Networking > Apartments >
Original Airport Extreme Setup
Apple AirPort Extreme (Original)
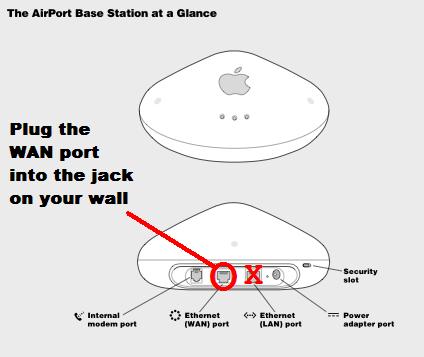
- Begin setup of your Airport Base Station by first plugging in the power. Give it 10 seconds or so to initialize and then plug an ethernet cable into your wall jack and into the port on the back of the router marked with the "Circle" or "Sun" symbol and labeled Ethernet (WAN) port.
- Next run the Airport Setup Assistant that should have come with your Airport Base Station, most likely on a CD. After clicking through the first screen you should select the option to Set up a new AirPort Base Station on the following screen and click Continue. The AirPort Setup Assistant will then try to detect your new wireless network.
- If it succeeds, you should see a screen saying that it has found the network and click Continue. If it fails, click Try again.

Selecting 128-bit WEP security will password-protect your wireless network.
- On the next screen, select Create a new wireless network, and then click Continue in order to properly configure your AirPort Base Station. You will be given the option of choosing a Wireless Network Name for your AirPort. You should change this from the default name to something unique so that your Base Station will not be confused with another. You can use the same name for your Wireless Network Name and your AirPort Extreme Name.
- This will take you to the next screen (seen above), select 128-bit WEP encryption in order to password protect your wireless network. You may also select WPA Personal encryption, however not all network cards support this, so check your documentation first. After selecting the encryption type, choose a password. Note that for 128-bit WEP, if non-Macintosh computers are going to be connecting to the wireless network your password must be exactly 13 characters long. Click Continue once you have finished.
- The Internet Setup screen should have the first option checked, I connect to the Internet with a DSL or cable modem using DHCP. The IP Address and other fields should have filled themselves automatically, do not alter them. The DHCP Client ID is not necessary. Click Continue.
- In the next screen you will be asked to set another password to protect your AirPort settings. This password should be different from the previous password for connecting to the wireless network. Click Continue.
- You will now see a list of the settings for your AirPort displayed. Review them and click Update if they are all correct. You will see a message telling you that your AirPort Extreme is configured to access the Internet. Click Quit before we go on to further secure your Base Station using the AirPort Admin Utility.
- Run the Airport Admin Utility that should have come on a CD with your Airport Base Station. You should see your AirPort base station listed under the name you gave it using the Setup Assistant. Select it and click Configure. Click Rescan if you do not see it initially, and the Admin Utility will make another attempt to find it.
- In the configuration screen that comes up, click Base Station Options and a new window will pop up. Uncheck the boxes for Enable SNMP Access and Enable Remote Configuration. All of the boxes in this screen should now be unchecked. Click OK.
- You will return to the first configuration screen again. Under the AirPort Network heading check the box for Create a Closed Network. A confirmation window will pop up asking if you are sure, click OK.
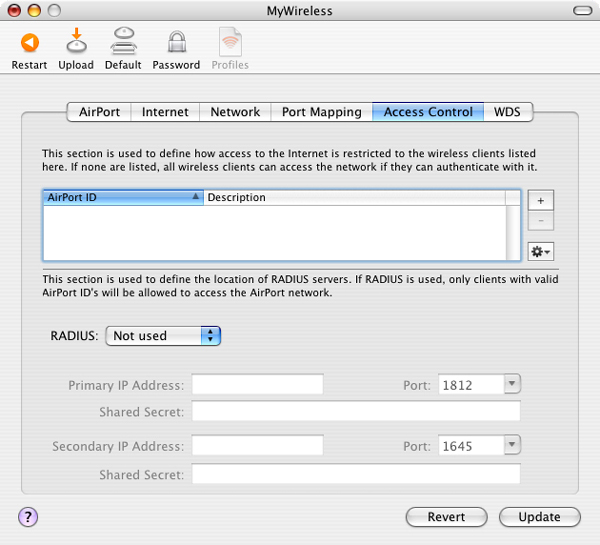
Creating an access control list will prevent unauthorized computers from using your connection.
- Next Click on the Access Control section at the top of the configuration window. In this section (seen above) you will configure your AirPort Base Station to only allow connections from computers which you define. Click on the + button next to the white box containing AirPort ID and Description fields. A small window will pop up with text fields for AirPort ID and Description. You can click the This Computer button to automatically fill them for the computer you are using, and then click OK.
- If you have another computer that you want to be able to connect to the Internet using your wireless access point, click the + button again. You will again get the pop up window. For other computers, you will have to manually enter the AirPort ID and Description. The AirPort ID is also know as a MAC address or Physical Address. You can get number on Windows computers by running the command ipconfig /all at the command prompt. After you have finished adding computers to this list, click the Update button in the bottom right corner of the configuration window. A window will pop up letting you know that the settings have been updated. You can click OK to close this window.
- Your AirPort Base Station is now secure.
|
|
|
 |
