 |
|
|
Networking > Apartments >
Netgear WGR614 Setup
Netgear WGR614 54Mbps Wireless Router
- Begin setup of your Netgear Wireless Router by first reading the instructions in the included manual, and following their guidelines for plugging in and initializing the access point. The first few steps in this guide should coincide with the information found in the manual, however we will follow up with important information on how to secure your wireless access point.
- After powering up the router, use an ethernet cable to connect your computer to one of the ports on it marked 1 through 4. Next open a web browser window on the connected computer and type http://192.168.1.1 into the address bar and press enter. This will take you to the Netgear Smart Wizard welcome page, click OK to begin the configuration. The router will attempt to detect the type of connection you have and the next message you receive should be Dynamic IP (DHCP) Detected, click Next once you see this.
- Next you will enable the wireless capability of your router. In the dropdown box for the region where you are located select United States from the list. On this screen you should also change the Wireless Network Name (SSID) from its default value to something unique so that your Base Station will not be confused with another. Click Next.
- You should now see a message confirming that your connection is working and wireless is enabled. However, your are not secured yet. Read the notes and click Done. Then direct your browser to http://www.routerlogin.net to continue the configuration. A window will pop up prompting you for your login and password, enter admin for the username and password for the password, then click OK.
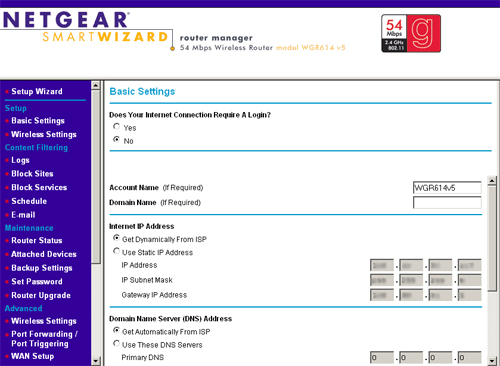
Accessing the router settings through a web browser.
- Once you have logged in you will see the main configuration page (shown above). Now click on the Wireless Settings at the left of the page. In order to password protect your wireless network select the WEP (Wired Equivalent Privacy) option under the Security Options and then under the Security Encryption (WEP) section that appears, select 128 bit next to Encryption Strength. Choose a password between 6 and 8 characters and type it into the Passphrase box under the Security Encryption (WEP) Key heading. Then click Generate. Finally click Apply. You may also select WPA encryption, however not all network cards support this, so check your documentation first.
- Next look for the Advanced section heading on the left side of the page and click on this Wireless Settings section. Disable the SSID broadcast option by unchecking the second box in this section and then click on the Setup Access List button.
- On this page (seen below) check the box to Turn Access Control On and click on the Apply button to save this setting.
- Now click on the Add button, this will display a Wireless Card Entry heading. This is where you will choose a name and enter a MAC Address, also known as Physical Address, for each computer that you will be using to connect to your wireless network. If you don't know how to get this information follow the steps here. Once you have finished, click the Apply button.
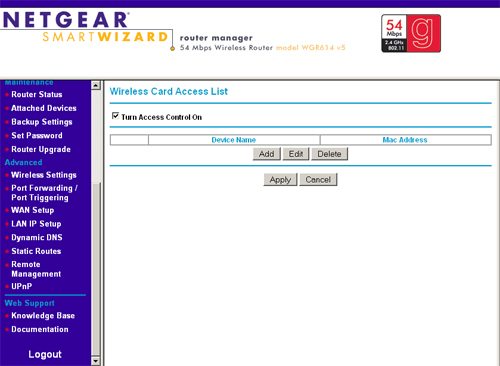
Creating an Access Control List will prevent unauthorized computers from using your connection.
- Finally click on the Set Password link on the left of the page under the Maintenance heading. Change the default password for accessing your wireless router setup pages by first typing the old one, password, into the appropriate field and then entering a new one into the New Password field and confirming it. This should be a different password than the one you setup for WEP encryption, but should also be atleast 6 to 8 characters in length. Click the Apply button.
- Your Netgear Wireless Router is now secure.
|
|
|
 |
