Back to Operative Videos
Click on image to view video demonstration.
Right-click here to download this video.
( Choose the "Save As ..." option from the menu.)
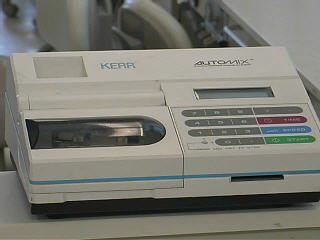
Keep in mind that once amalgam has been triturated, it immediately begins to harden; therefore it is important to make all necessary preparations for the procedure—including benchtop setup and matrix placement—prior to triturating the amalgam. Before triturating the amalgam, turn on the amalgamator using the on/off switch in the back. When turned on, a default mixing speed and length of time are shown in the display window. Amalgam must be mixed according to the manufacturers instructions; for the Valiant PhD amalgam that we use, the trituration speed should be 4200 CPM, with time set at 7.0 seconds for a 1 spill amalgam cartridge, and 9.0 seconds for a two spill cartridge, which has twice as much amalgam. (Both cartridges look the same, but will have a number at the bottom of the cartridge designating one or two spill; one spill is often enough for many occlusal restorations, while a 2 spill is often necessary for compound restorations, such as a Class II.)
To set the speed, push the “Speed” button, and enter the correct speed using the key pad, To set the time, push the “Time” button and enter the appropriate time; be sure to enter at two digits; for example, to set the machine for 8 seconds, enter 8-0.
Open the window and locate the amalgam carriage, which has a sliding part on the left that adjusts to hold the amalgam cartridge in place. Place the amalgam capsule in the carriage and slide the carriage holder to the right so that the cartridge is securely held within the carriage. Close the window and push the start button.
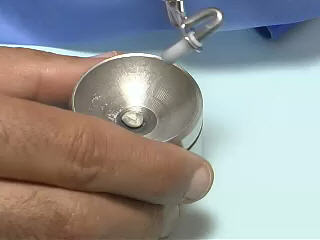
Once trituration is complete, remove the capsule; tap the amalgam capsule upside-down against the bench top to make sure it does not stick to the container, and use the handle of the mirror to pry open the cap and empty the amalgam into the metal well. The amalgam should be spherical and shiny.
Back to top | Back to Operative Videos
Click on image to view video demonstration.
Right-click here to download this video.
( Choose the "Save As ..." option from the menu.)
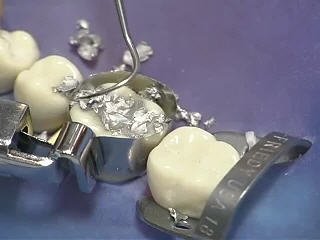
Load the amalgam carrier with amalgam from the well; place the amalgam into the occlusal segment of the prepared cavity. Begin condensation using a small condenser to condense a portion of the amalgam into the proximal box area. Place pressure and condense into all line angles, as well as against the matrix band. Next, use the largest size condenser that will fit into the proximal area to condense more of the amalgam into the proximal box. Again, be sure to condense pulpally and laterally, adapting amalgam into all cavity walls and line angles, and into the matrix band. Remove any amalgam at the surface that appears shiny and wet; this contains the excess mercury that has surfaced during condensing.
Place additional increments of amalgam and continue condensing pulpally, laterally and against the matrix band, removing any excess mercury that comes to the surface. It is important to overfill the cavity with a generous amount of amalgam, so that the proper occlusal anatomy can be attained during carving. If necessary, mix another cartridge of amalgam. As the cavity becomes filled, condense and smear amalgam into and over the cavosurface margin.
Back to top | Back to Operative Videos
Click on image to view video demonstration.
Right-click here to download this video.
( Choose the "Save As ..." option from the menu.)
Refer to the “Steps in Carving Amalgam” handout for complete instructions on carving amalgam.
1. Immediately after completing condensation, use the explorer to separate the newly condensed amalgam from the matrix band,to define the contact area and marginal ridge, and to define the occlusal embrasure. This is done by resting the tip of the explorer against the matrix band and moving the explorer from the linguo-proximal markin toward the buccal, stopping at the center of the box. Repeat the procedure again, this time starting from the bucco-proximal margin.
2. Use the beaver tail to remove excess amalgam from the occlusal surface without touching the cavosurface margin.
3. Remove the matrix retainer.
Holding the band in place with your finger, unscrew the matrix retainer and remove it from the band. Carefully remove the band from the tooth except at the proximal surface that is being restored; fold the band back away from the tooth at this area.
4. Occlusal carving is started when the amalgam shows some resistance to the carving instrument; use an explorer, discoid or cleoid to test the amalgam for resistance.. Angle the cleoid so that the tip rests in the area where the secondary groove will be, and the side rests against the remaining tooth structure of the cusp; the instrument is inclined so that the existing tooth structure can help shape the amalgam, thus restoring the natural occlusal anatomy. Occlusal carving is done with a “pull” stroke, however, the “push” stroke can also be suitable in developing occlusal anatomy. Form the distal and mesial pits first, followed by the buccal and lingual grooves. Once occlusal anatomy is complete, use a moist cotton pellet to smooth the occlusal surface of the amalagam.
Carefully remove the matrix band by rotating it and sliding it out of place.
Place the tip of the explorer against the adjacent tooth, with the blade resting on the existing tooth structure of the tooth’s proximal surface, and use a shaving motion from cervical to occlusal, to shape the proximal surface and remove any excess amalgam. Use one of these instruments to also remove any excess amalgam from the cervical region, to define the gingival cavosurface margin. Proximal carving should define both the occlusal and gingival embrasures.
Tips: When placing the matrix band, place a piece of floss in the interproximal space, outside of the matrix band; this floss can be used later to help smooth out the cervical area of the proximal surface
Tip: Use a discoid or spoon excavator to round out the marginal ridge; be sure to keep the blade resting on existing tooth structure while shaping the marginal ridge.
Back to top | Back to Operative Videos